
How to Set Up a Proxy: Step-by-Step for Windows, macOS, Firefox, Chrome, and Python
Setting up a proxy sounds technical, but it’s really just telling your device or your code where to send traffic before it reaches the internet.
This guide walks through every major method: system-level setup on Windows and macOS, browser-level setup in Firefox and Chrome, and code-level setup for developers who need rotating proxies in Python.
Pick the section that matches what you’re actually trying to do.
What You Need Before You Start
Whatever method you use, you’ll need the same basic information from your proxy provider first:
Proxy IP address or hostname (something like proxy.example.com or an IP like 198.51.100.10)
Port number (commonly 8080, 3128, or a custom port your provider assigns)
Protocol type: HTTP, HTTPS, or SOCKS5. SOCKS5 handles more traffic types and doesn’t modify your data the way HTTP proxies sometimes do, but not every tool supports it natively.
Username and password, if your proxy requires authentication (most paid residential and datacenter proxies do)
Keep these details handy. You’ll paste them into a settings field or a code snippet depending on which method you follow below.
How to Set Up a Proxy on Windows 11
Windows handles proxy settings at the system level, which means most apps, including Chrome and Edge, will automatically use whatever you configure here.
Step 1: Open Settings (Windows key + I).
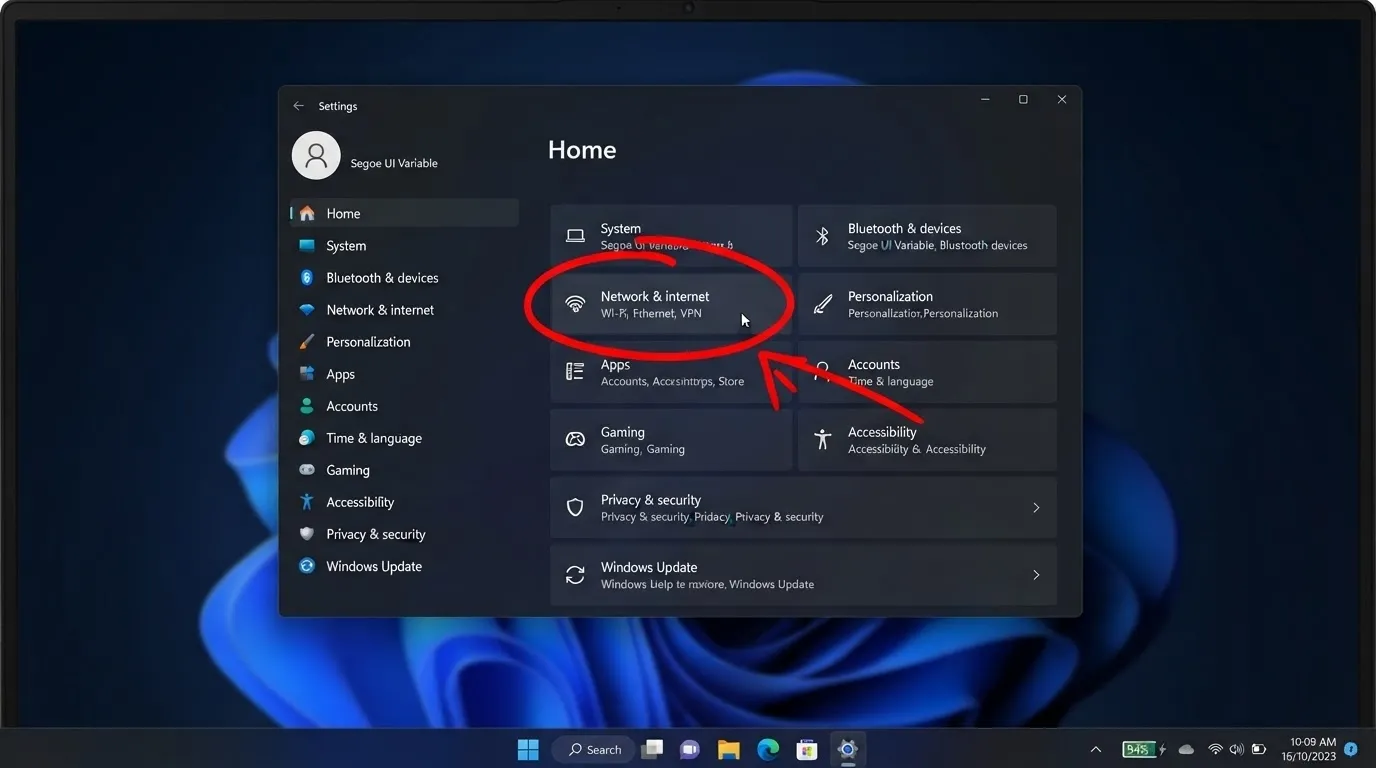
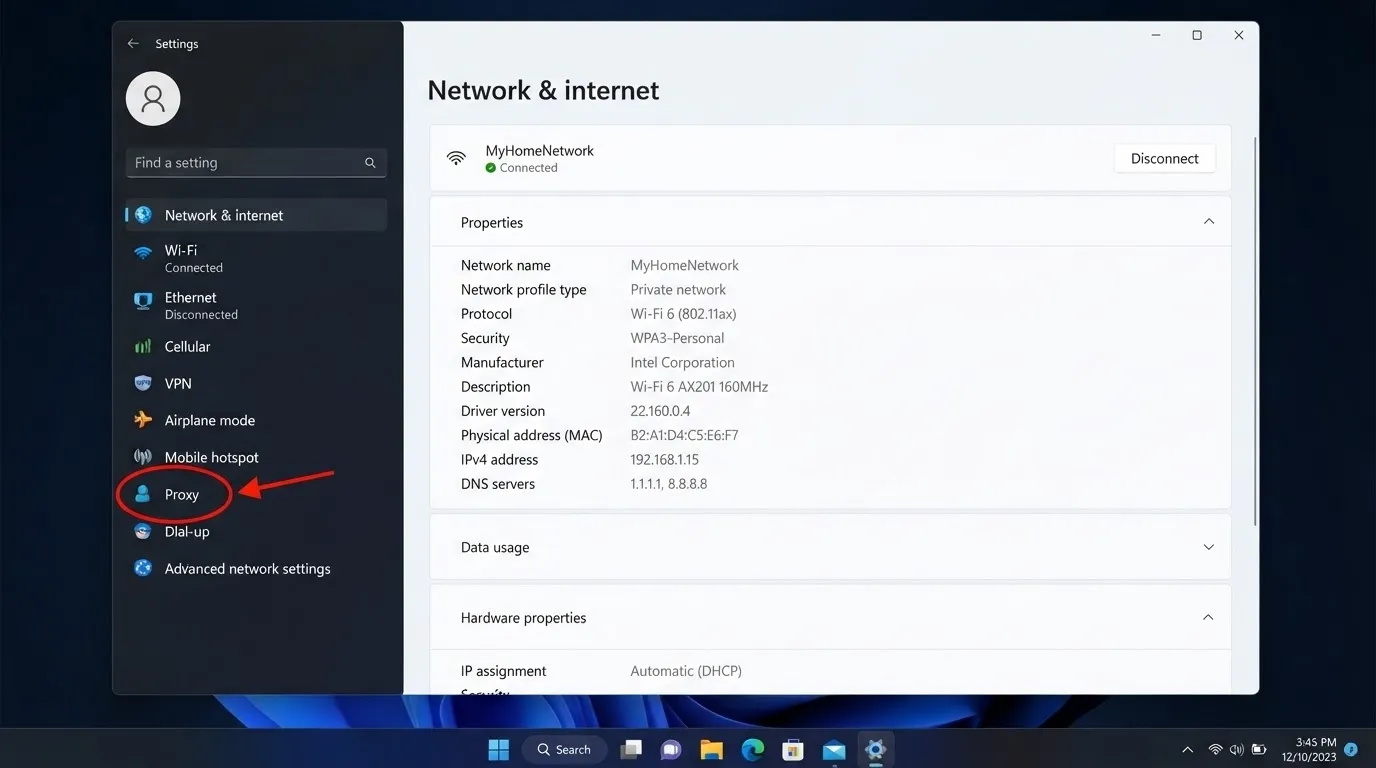
Step 2: Go to Network & Internet, then click Proxy.
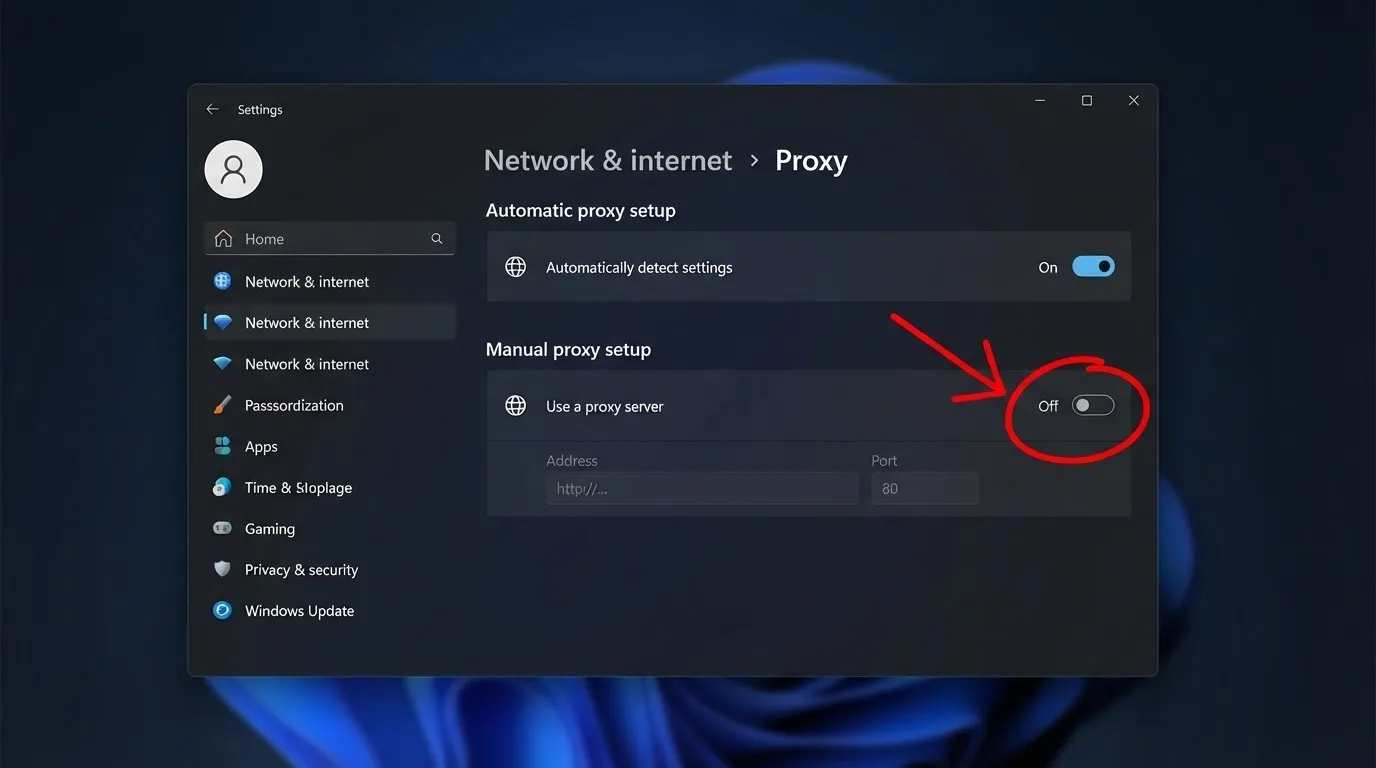
Step 3: Under “Manual proxy setup,” toggle Use a proxy server to On.
Step 4: Enter your proxy’s IP address and port number in the fields provided.
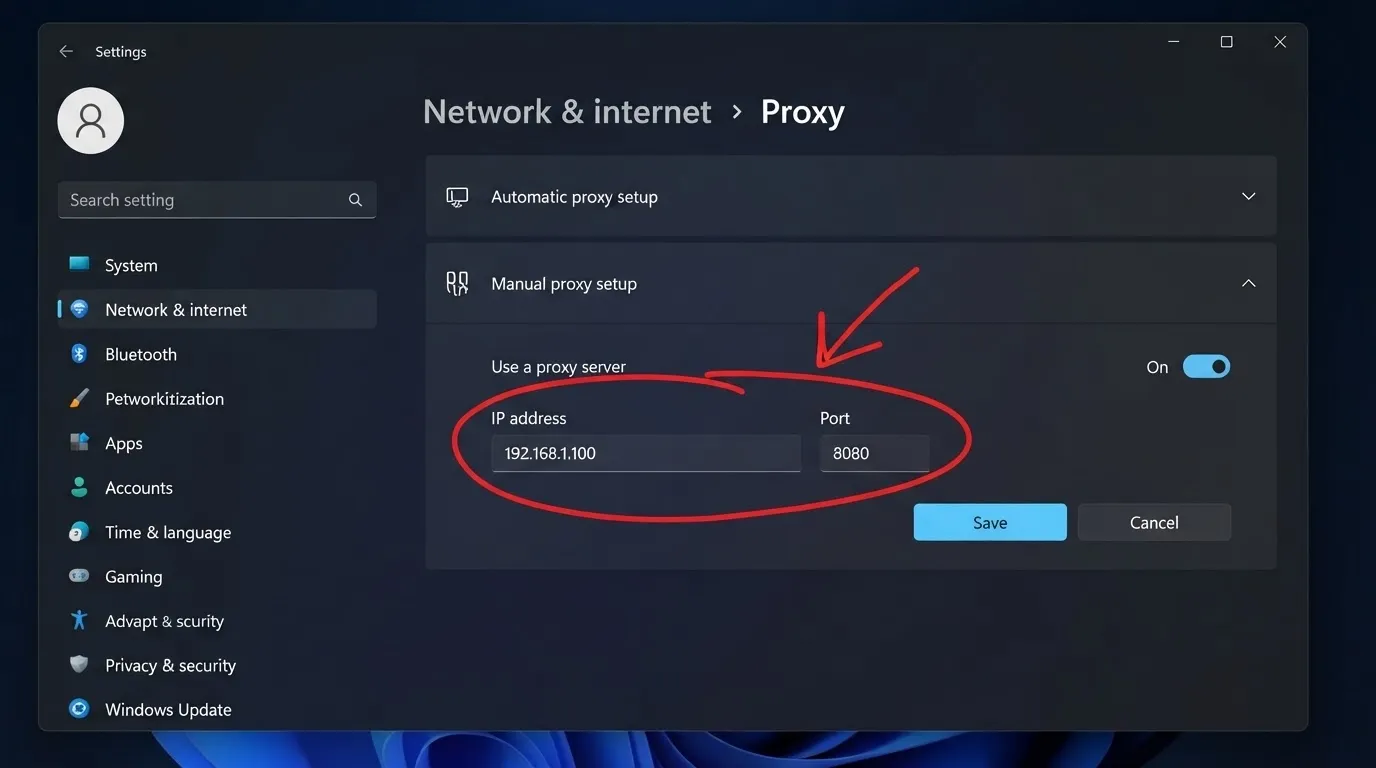
Step 5: If you need to exclude certain sites or local addresses from the proxy, add them under “Don’t use the proxy server for addresses beginning with.”
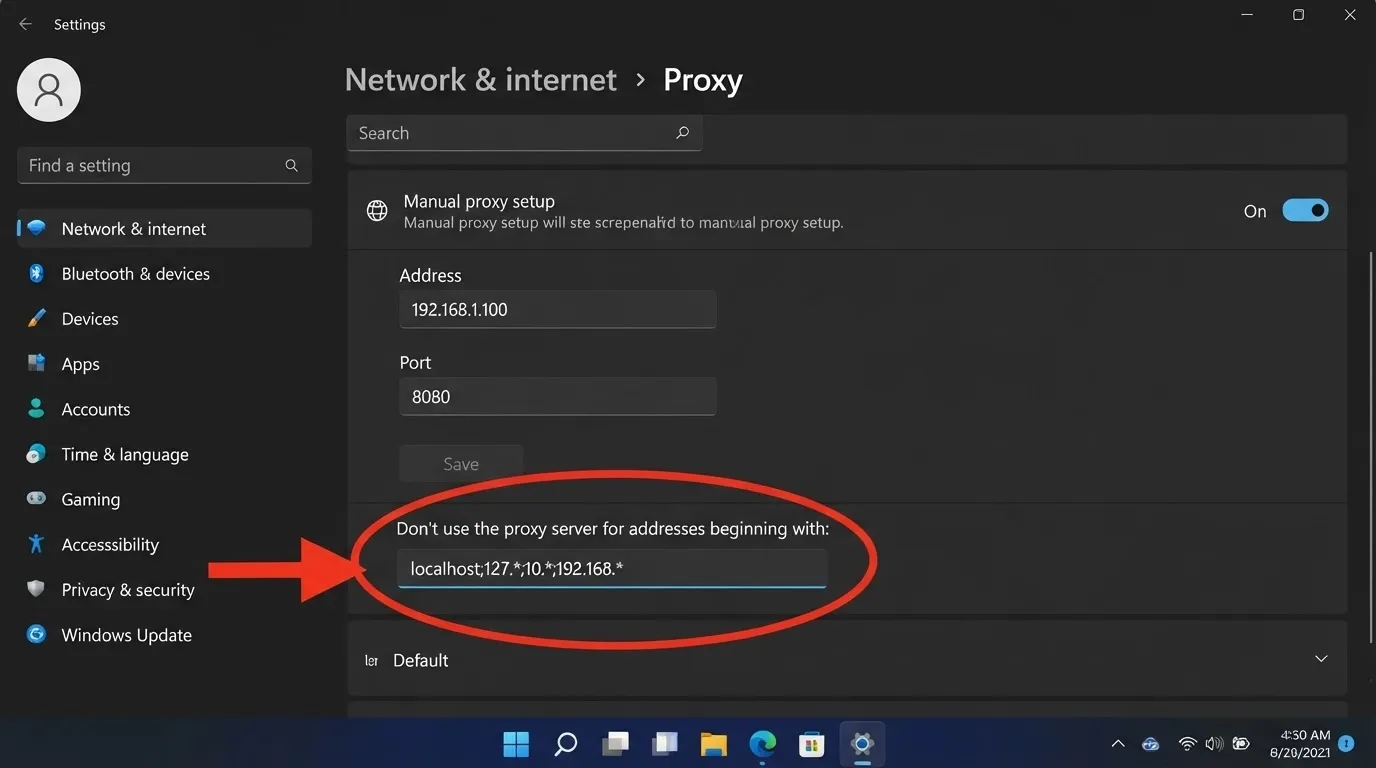
Step 6: Click Save.
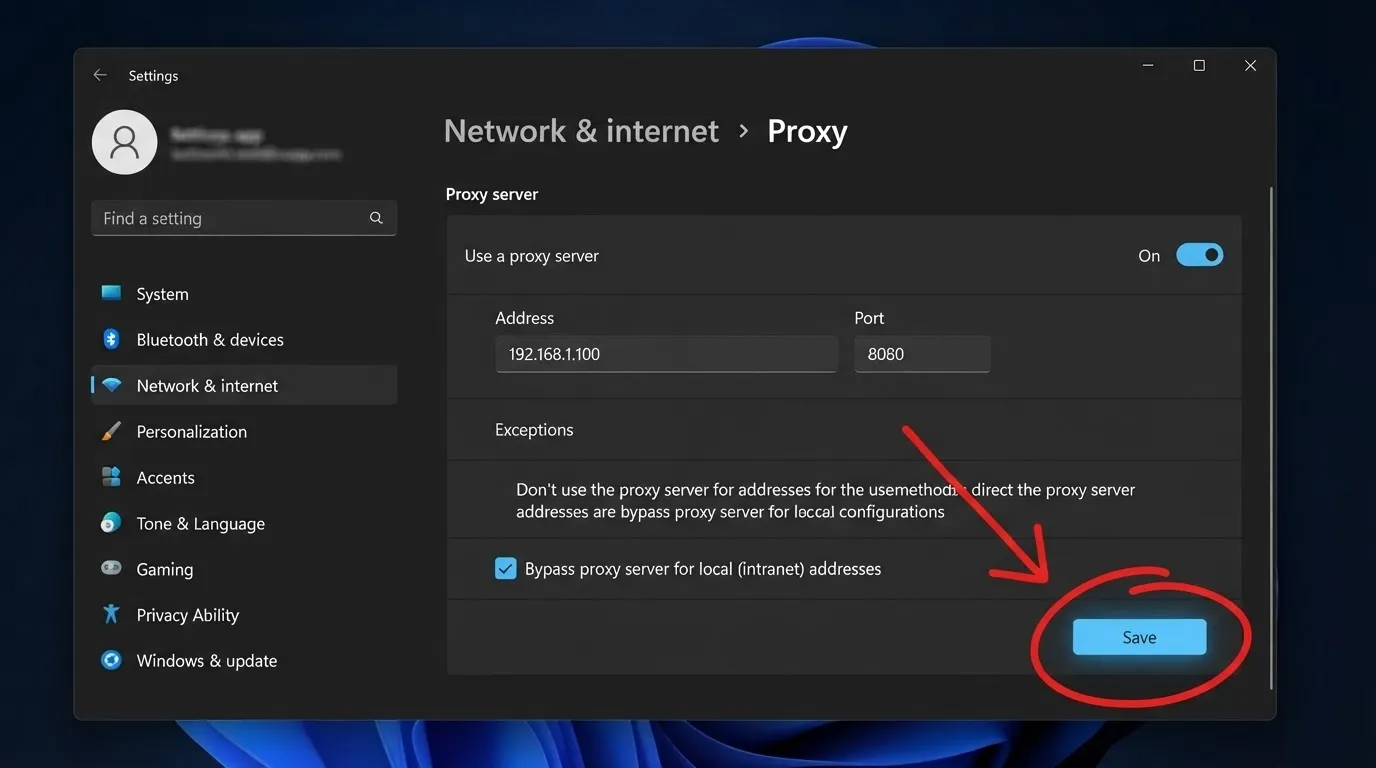
One limitation worth knowing: Windows’ built-in proxy settings only support HTTP and HTTPS proxies natively.
If you need SOCKS5 working system-wide, for desktop apps or tools that don’t have their own proxy settings, you’ll need third-party software like Proxifier.
Install it, go to Profile > Proxy Servers, enter your SOCKS5 details and authentication credentials, then use Profile > Proxification Rules to control exactly which applications route through the proxy.
How to Set Up a Proxy on macOS
macOS keeps proxy settings under Network preferences, and the process is straightforward.
Step 1: Open System Settings, then click Network.
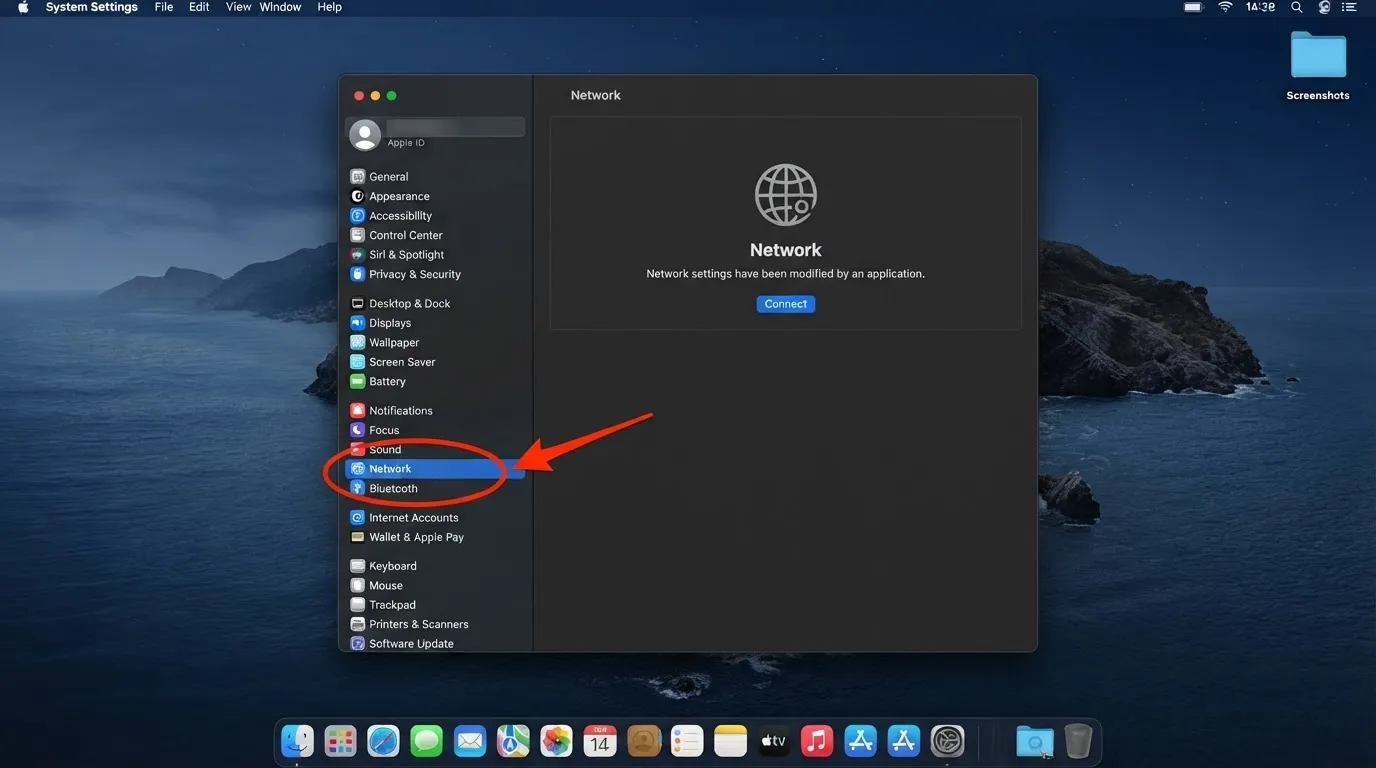
Step 2: Select your active connection (Wi-Fi or Ethernet), then click Details (or Advanced, depending on your macOS version).
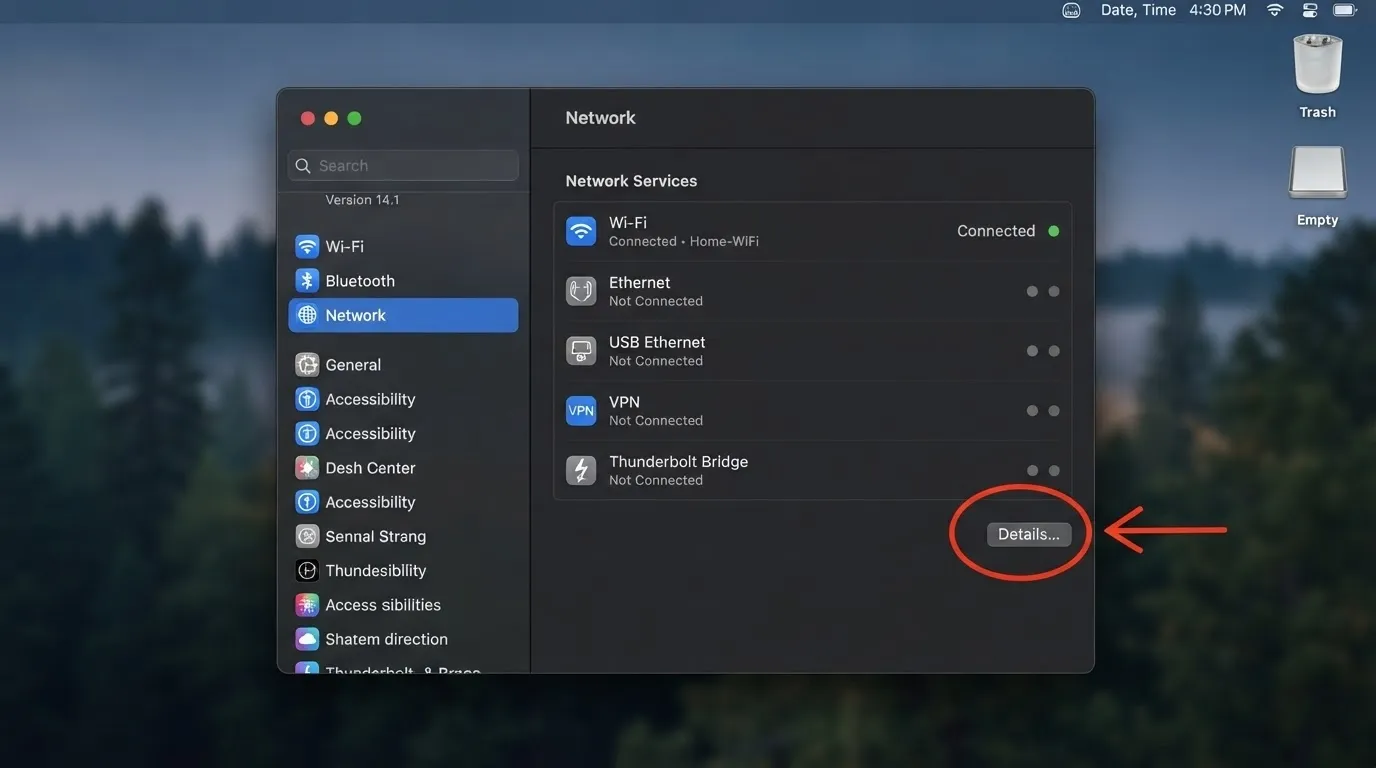
Step 3: Go to the Proxies tab.
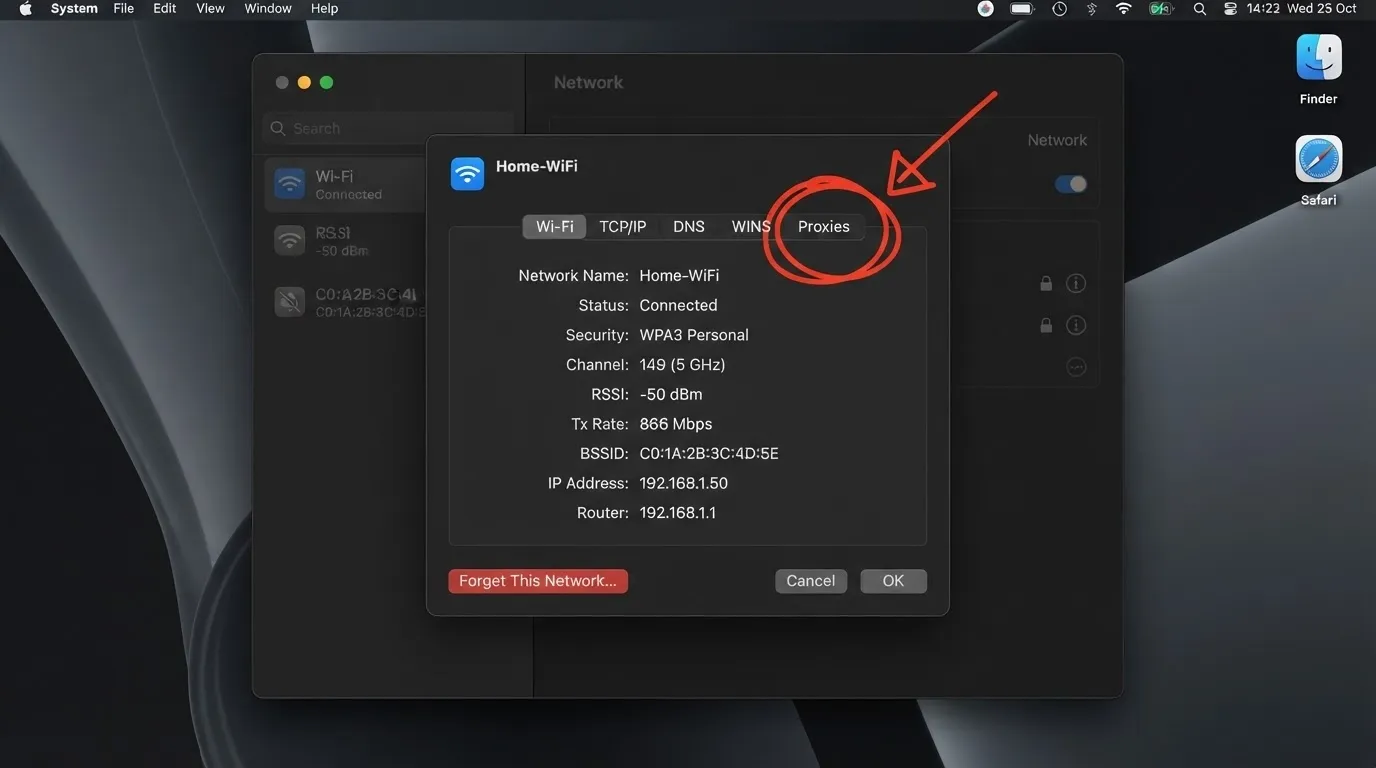
Step 4: Check the box for the proxy type you need (Web Proxy HTTP, Secure Web Proxy HTTPS, or SOCKS Proxy).
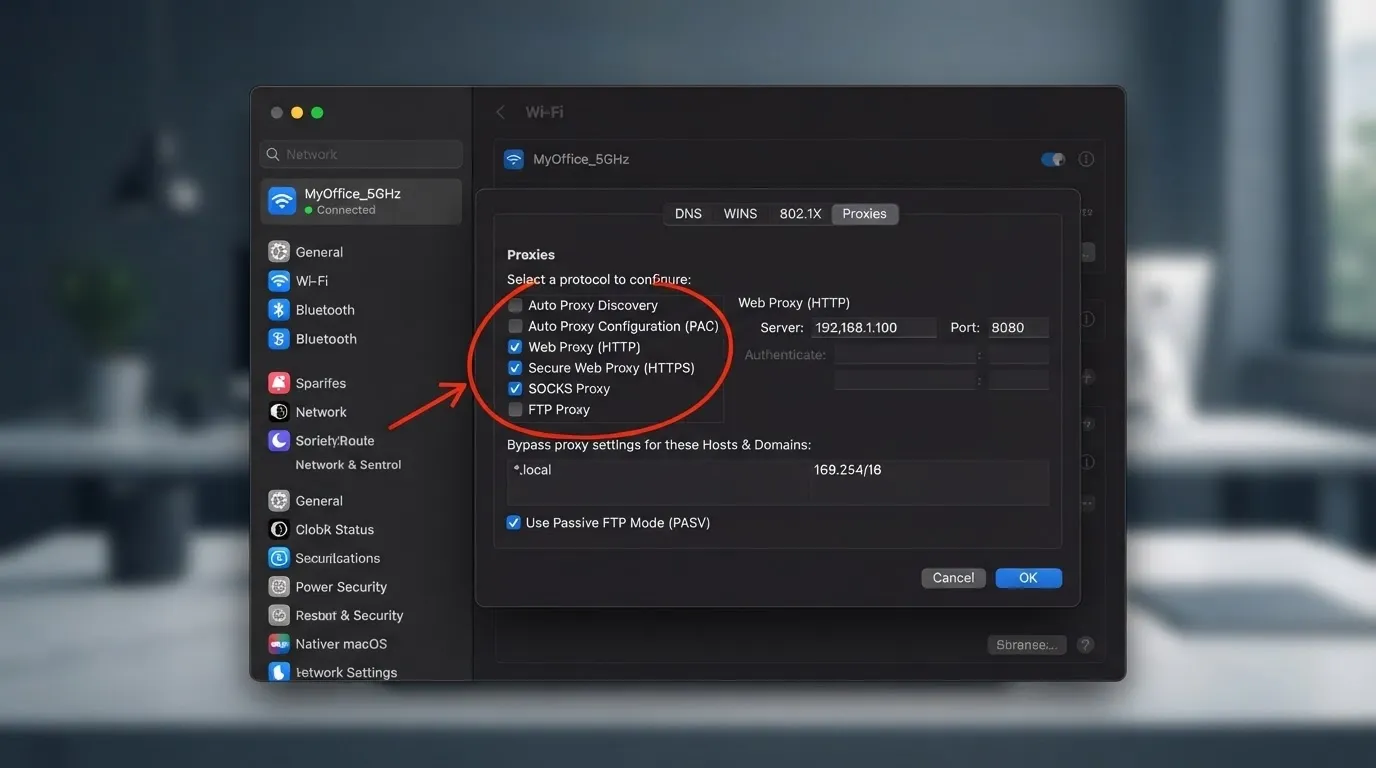
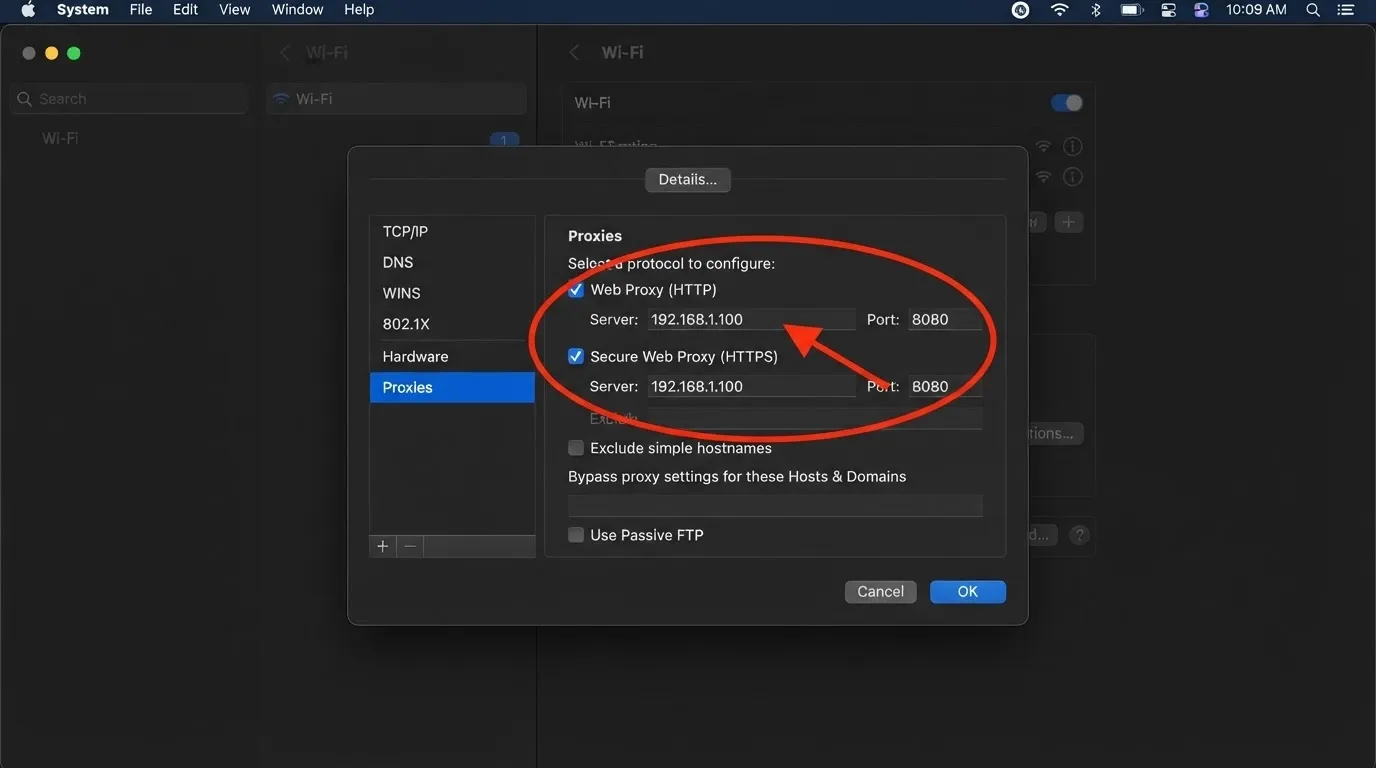
Step 5: Enter the server address and port number.
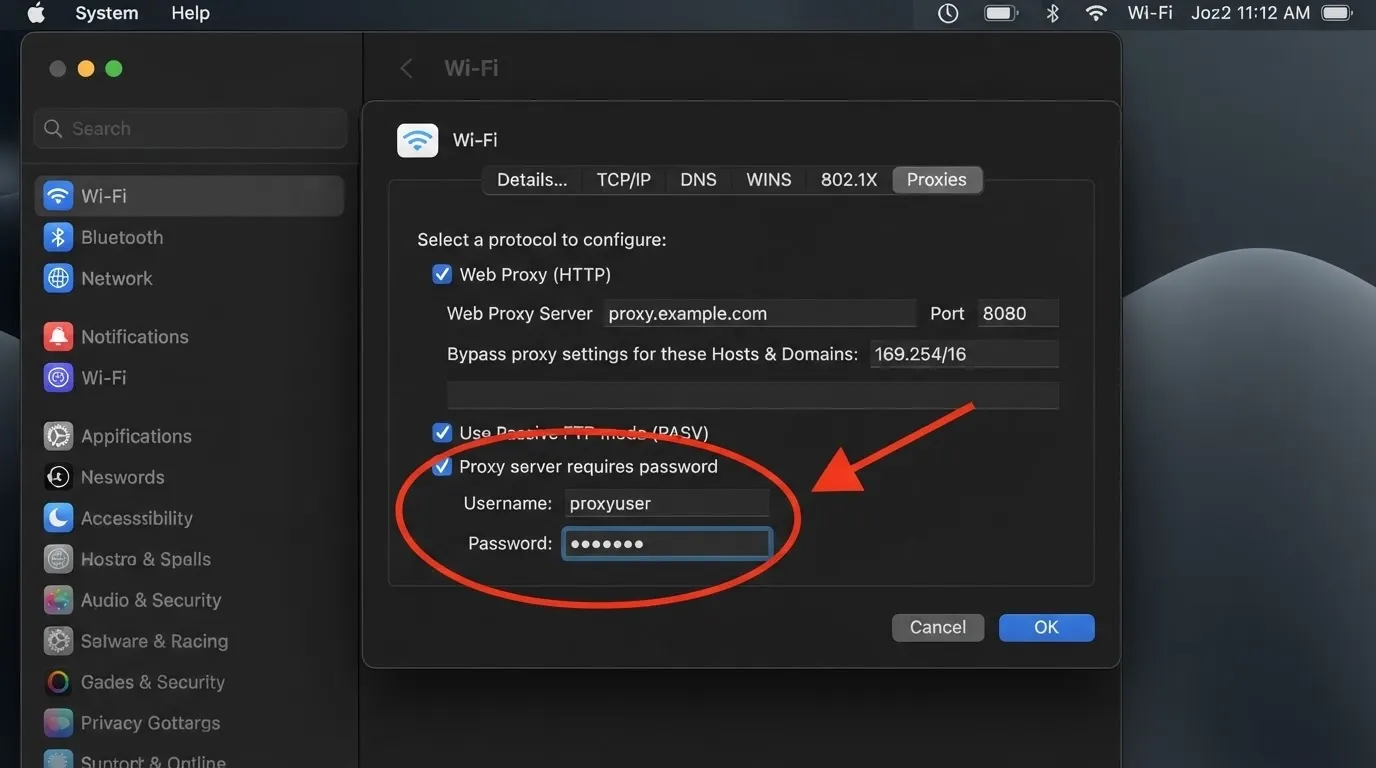
Step 6: If authentication is required, check the “Proxy server requires password” box and enter your credentials.
Step 7: Click OK, then Apply.
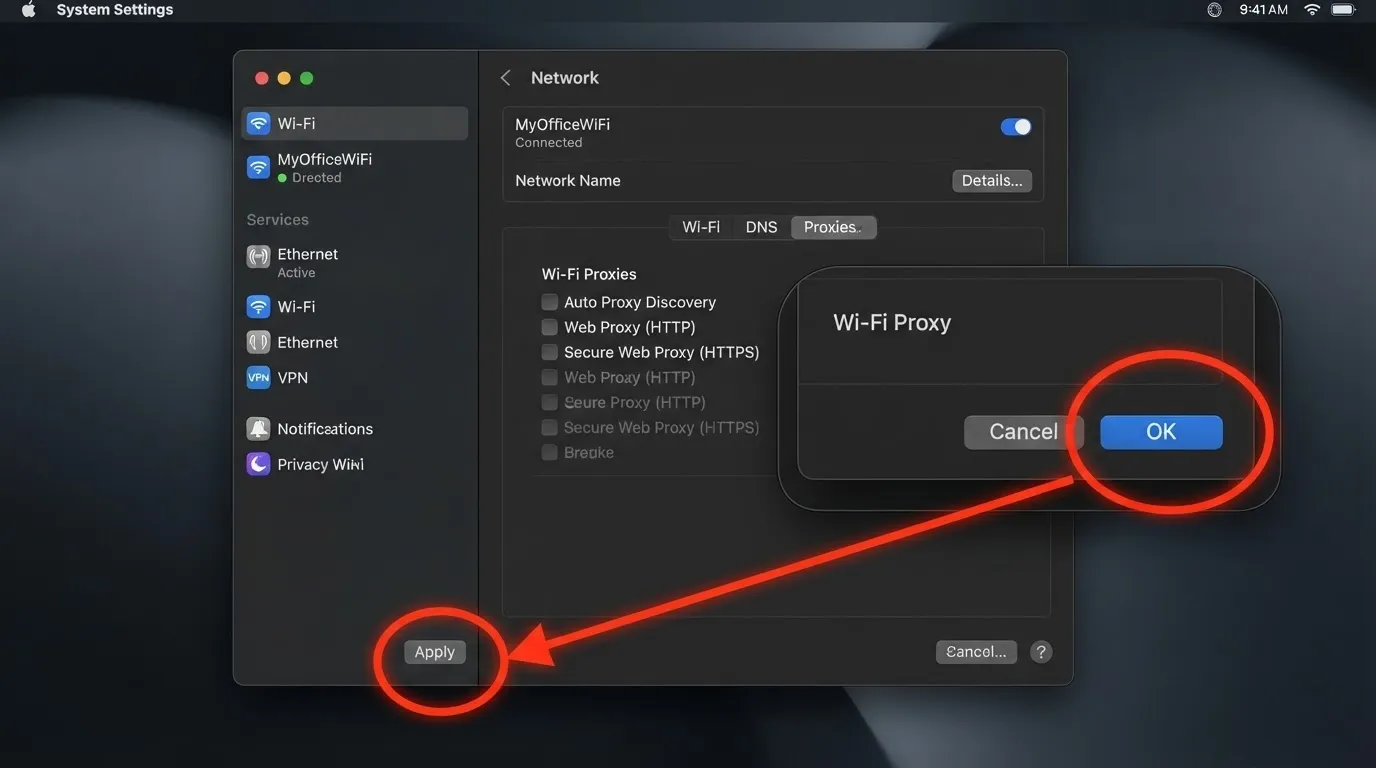
Like Windows, this applies system-wide, so browsers and apps that use system network settings will route through it automatically.
Firefox is the notable exception, which brings us to the next section.
How to Set Up a Proxy in Firefox
Firefox is unusual among major browsers because it doesn’t automatically use your operating system’s proxy settings.
It keeps its own, independent configuration, which is actually useful if you want one browser proxied while everything else on your machine stays direct.
Step 1: Open Firefox and click the hamburger menu (three horizontal lines) in the top-right corner.
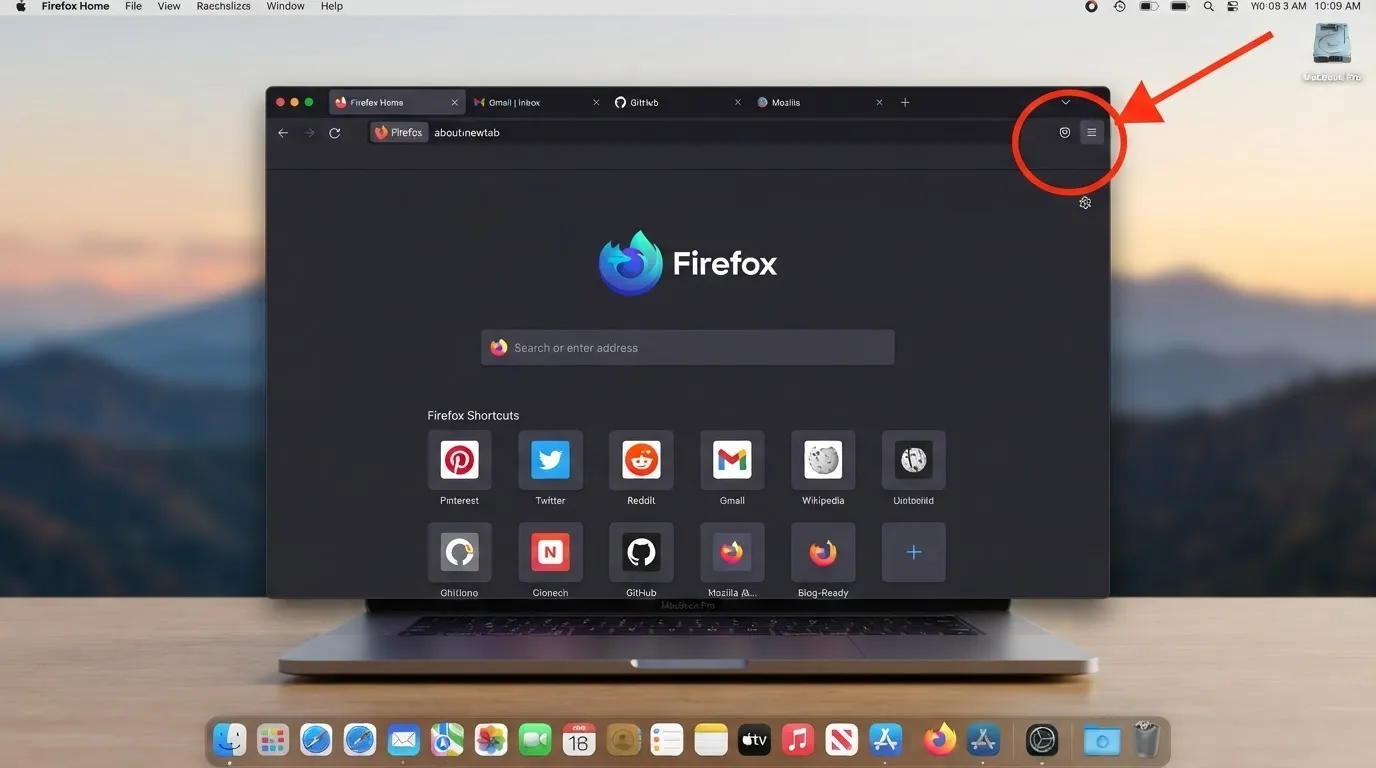
Step 2: Select Settings.
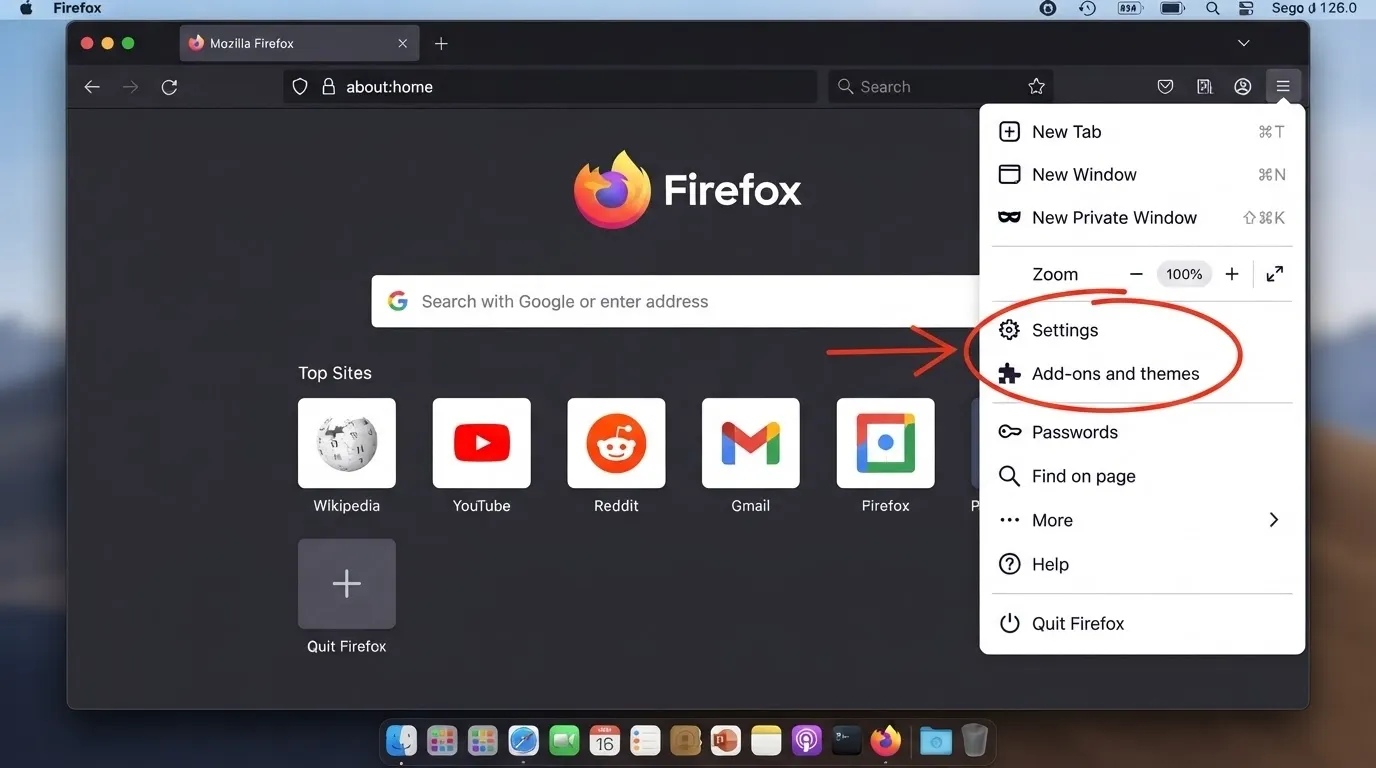
Step 3: In the General panel, scroll down to the Network Settings section.
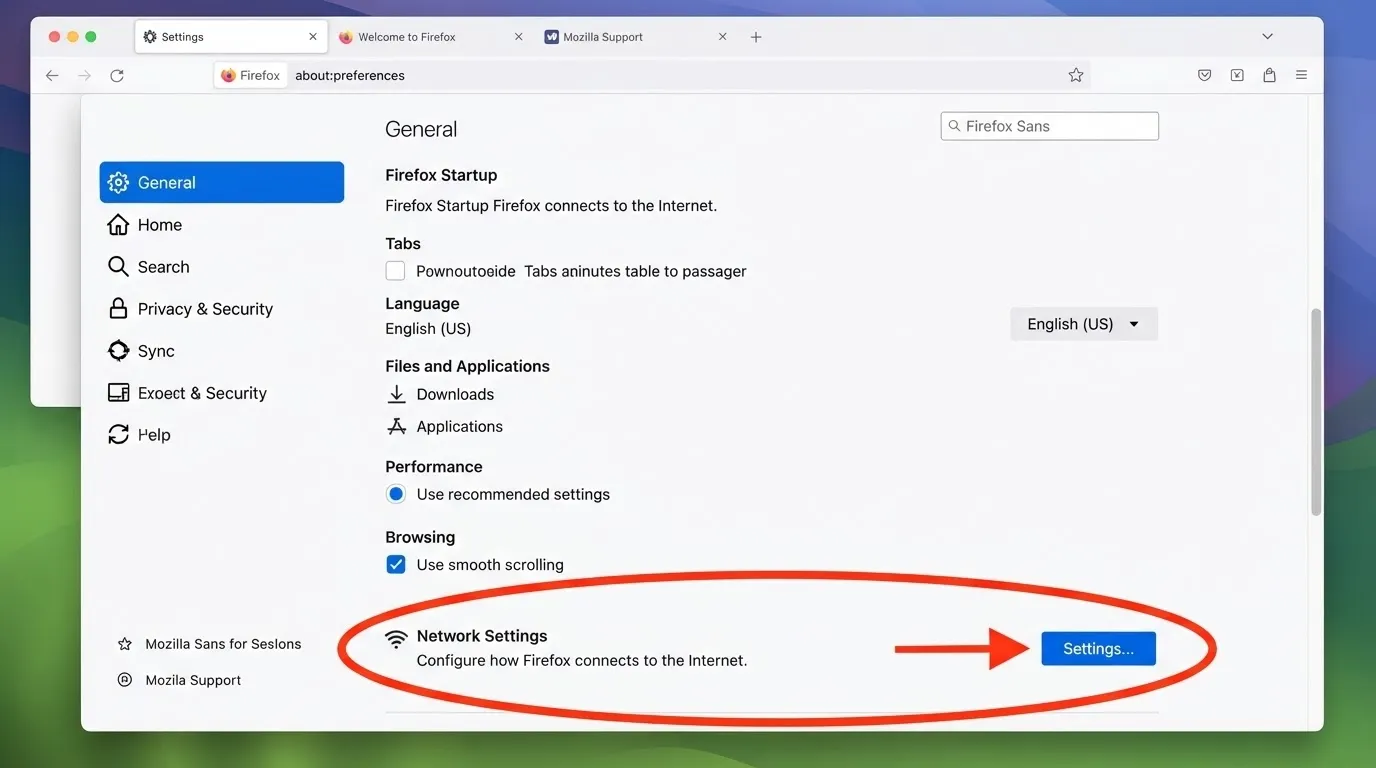
Step 4: Click Settings next to it. This opens the Connection Settings window.
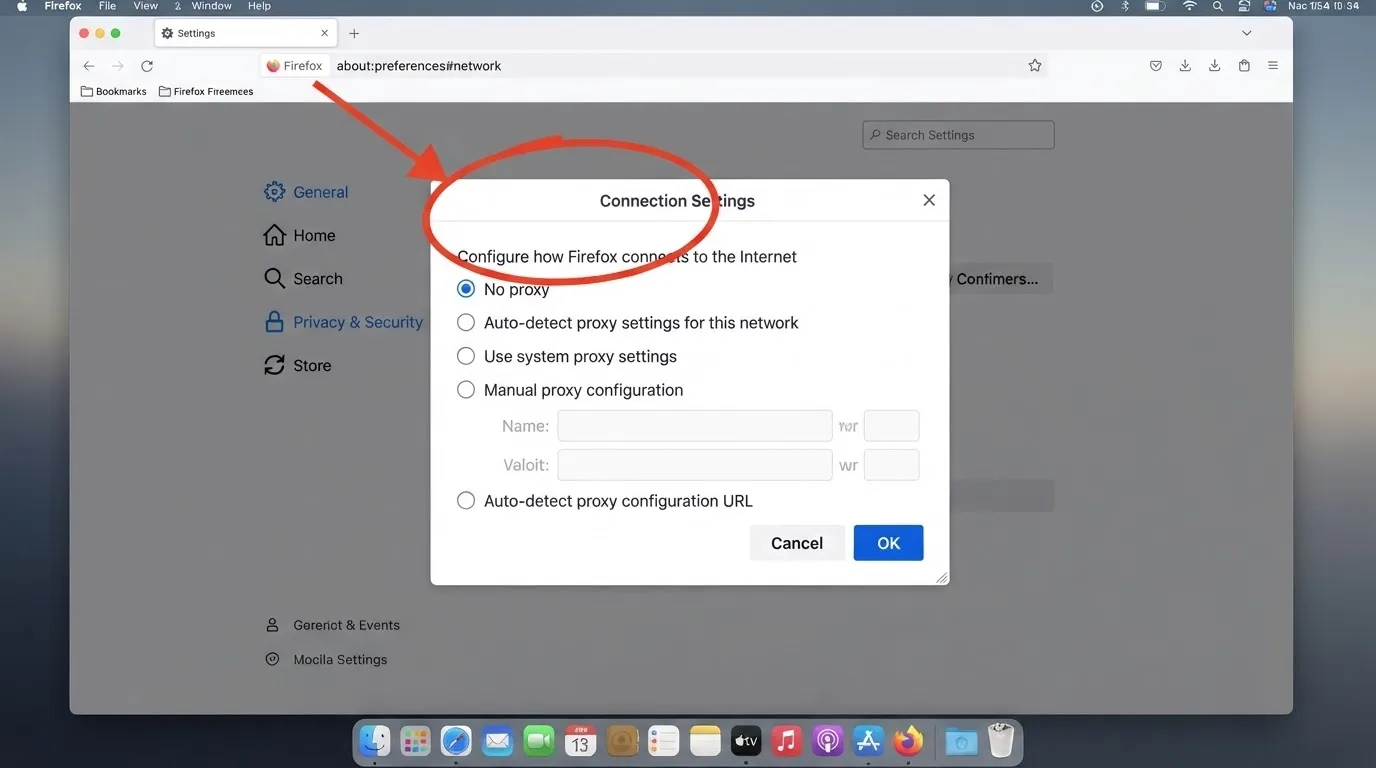
Step 5: Choose Manual proxy configuration.
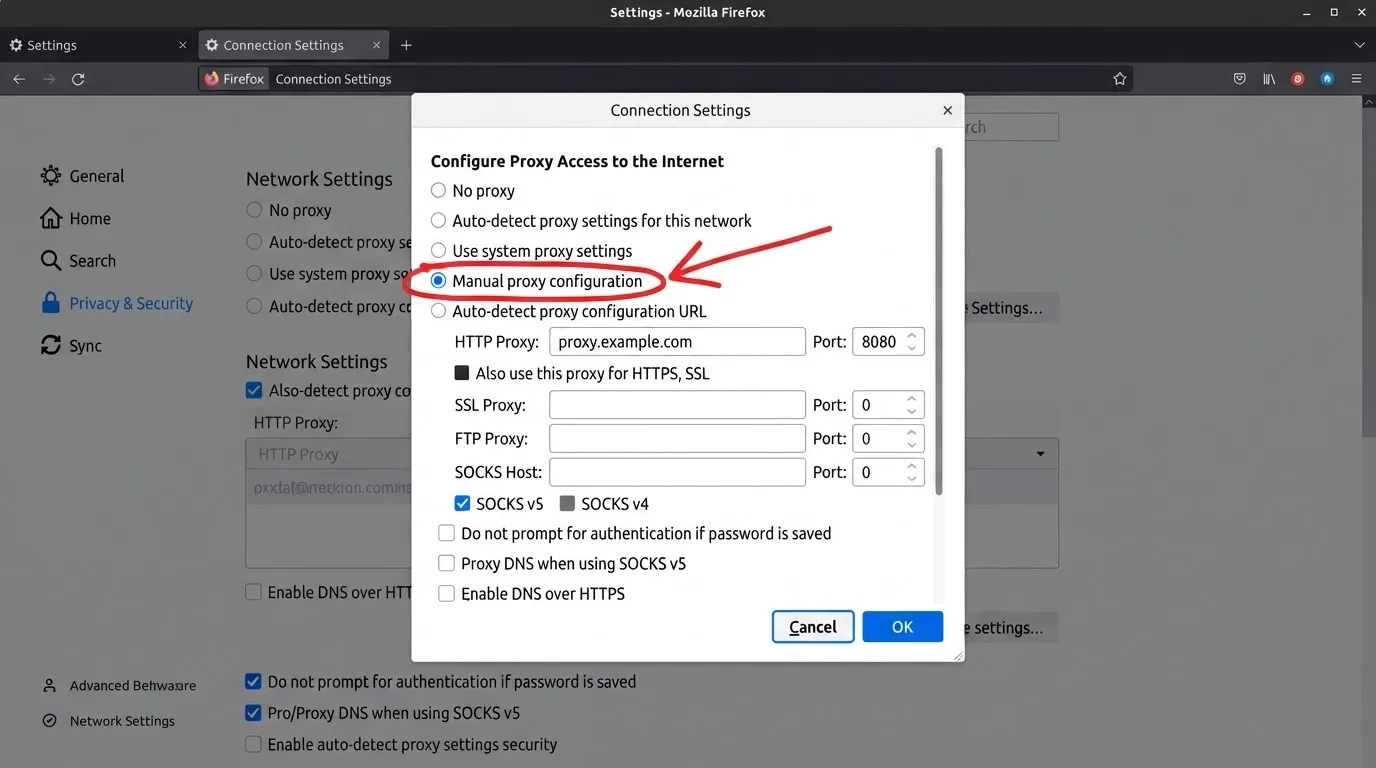
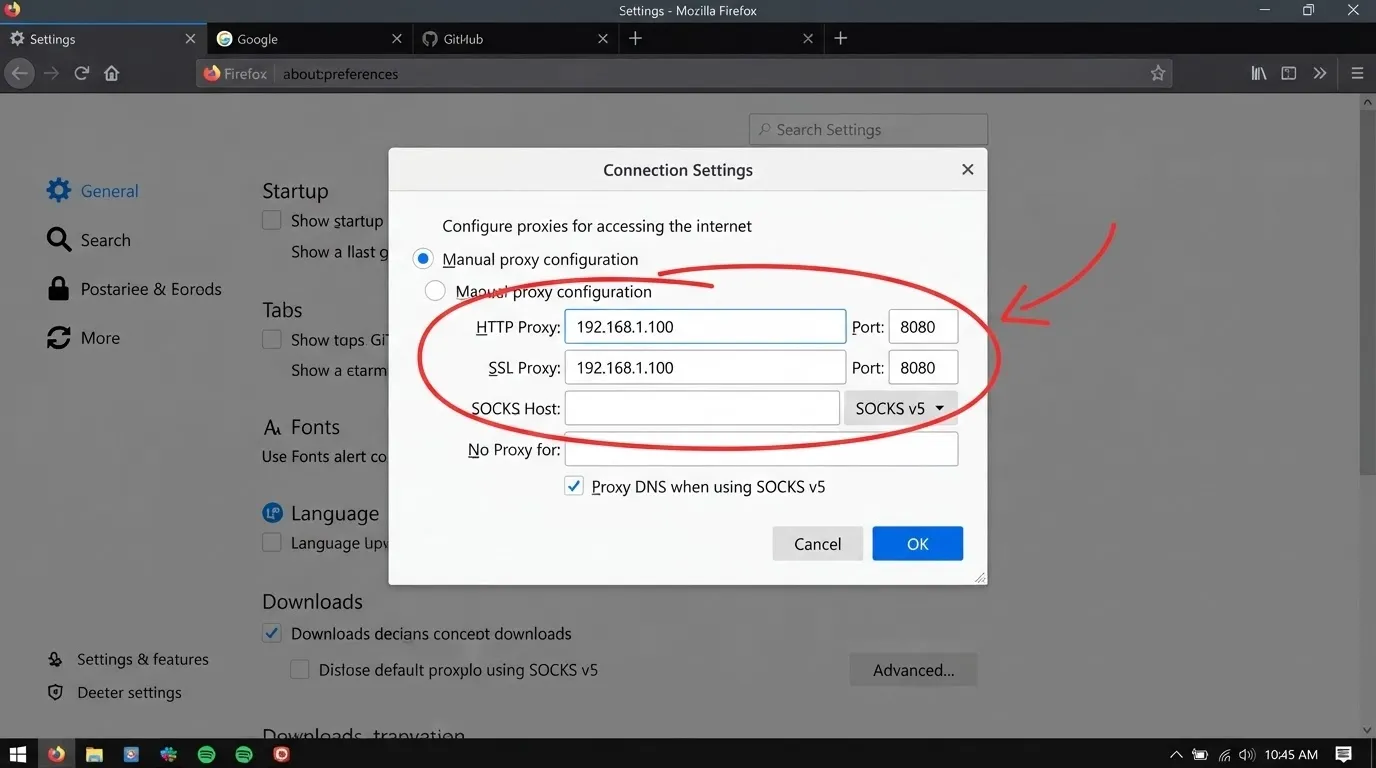
Step 6: Enter your proxy’s hostname and port. If you’re using SOCKS5, enter it in the SOCKS Host field instead and select SOCKS v5.
Step 7: Check Also use this proxy for HTTPS if you want encrypted traffic routed through the same proxy.
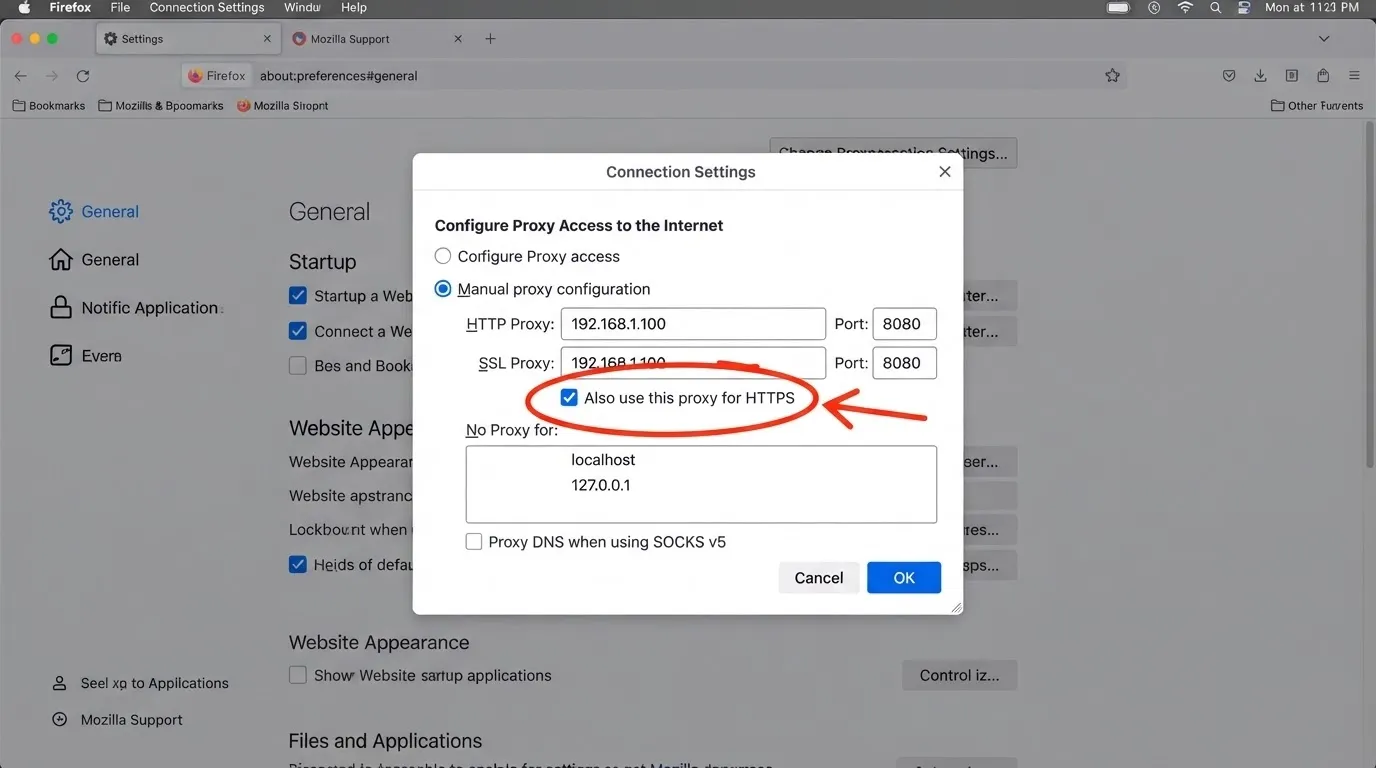
Step 8: Click OK to save.
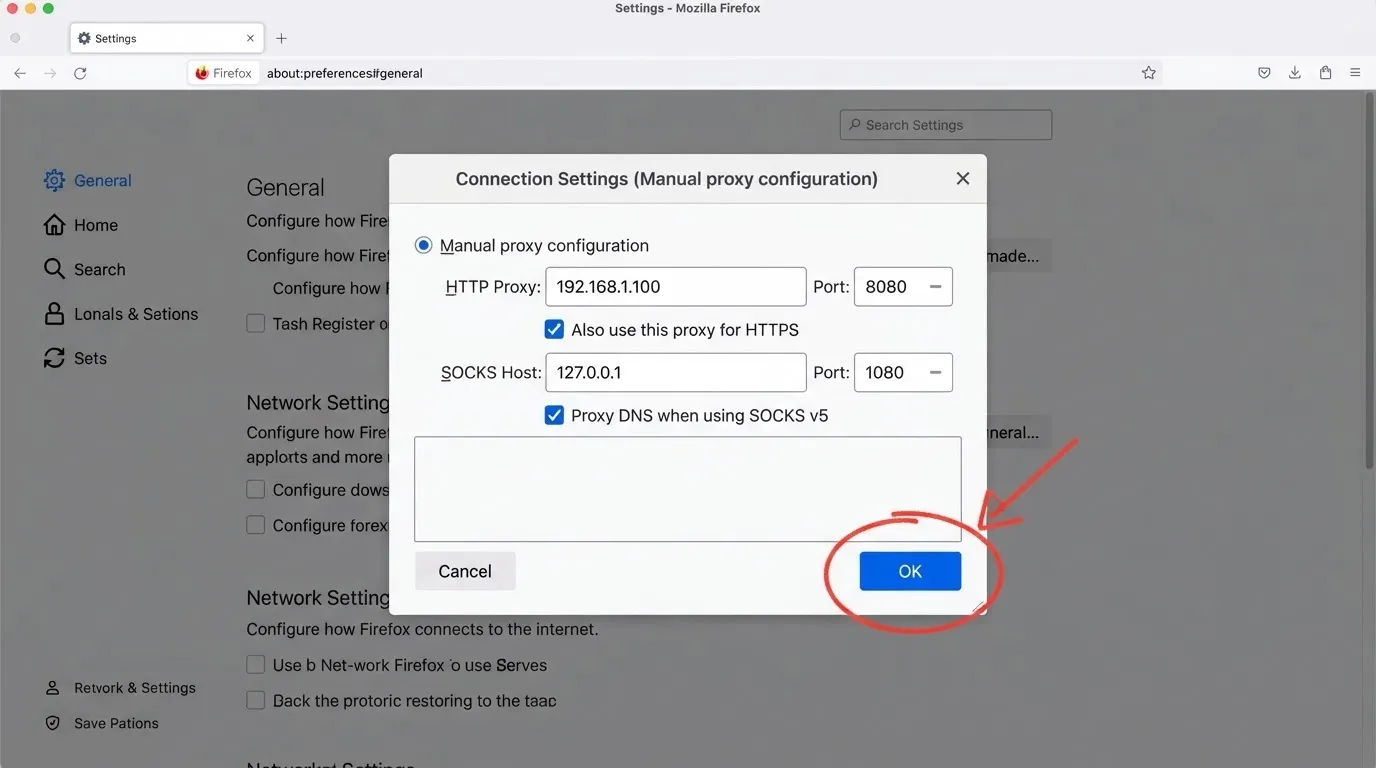
If you’d rather Firefox just inherit whatever proxy you already configured at the OS level, select Use system proxy settings instead of Manual proxy configuration in that same window.
And if your proxy requires authentication, Firefox will prompt you for a username and password the first time you load a page through it, so you don’t need to enter credentials in the settings screen itself.
One quick note on privacy: by default, Firefox may leak DNS requests outside the proxy tunnel when using SOCKS5. To prevent this, go into about:config, search for network.proxy.socks_remote_dns, and set it to true.
This forces DNS lookups through the proxy too, rather than revealing your real network’s DNS queries.
How to Set Up a Proxy in Chrome or Edge
Chrome and Edge don’t have their own separate proxy settings on Windows or macOS. Instead, they use whatever proxy is configured at the operating system level, the same settings you set up in the Windows or macOS sections above.
If you’ve already configured a system-wide proxy, Chrome and Edge are already using it. No extra steps needed.
If you want a proxy that applies only to Chrome without touching your system-wide settings, you can launch Chrome from the command line with a proxy flag:
# HTTP or HTTPS proxy
google-chrome –proxy-server=”http://proxy-ip:port“
# SOCKS5 proxy
google-chrome –proxy-server=”socks5://proxy-ip:port”
# With a separate profile directory, useful for running multiple proxy sessions at once
google-chrome –proxy-server=”socks5://proxy-ip:port” –user-data-dir=”/tmp/chrome-proxy1″
This approach is popular among people managing multiple accounts or browser profiles, since each launched instance can point to a different proxy without conflicts.
For simpler day-to-day use, a browser extension like FoxyProxy also works well, letting you switch between saved proxy configurations with a couple of clicks instead of editing system settings each time.
How to Test Your Proxy Is Actually Working
Before assuming everything’s configured correctly, confirm it. Visit a site like whatismyipaddress.com or similar IP-checking service after setting up your proxy. If the IP address shown doesn’t match your real one, and matches the location or provider of your proxy instead, it’s working.
If you still see your real IP, double-check the port number and make sure you saved the settings correctly, and confirm the proxy server itself is actually online and not down on the provider’s end.
How to Configure Rotating Proxies in Python
For developers doing web scraping, automated testing, or any task that needs to avoid rate limits or IP bans, a single static proxy usually isn’t enough.
You need proxy rotation, sending each request (or each batch of requests) through a different IP address. Here’s how to actually build that using Python’s requests library.
Basic Single-Proxy Setup
Before rotating anything, here’s the simplest possible setup, routing one request through one proxy:
import requests
proxies = {
“http”: “http://username:password@proxy-ip:port“,
“https”: “http://username:password@proxy-ip:port“
}
response = requests.get(“https://httpbin.org/ip“, proxies=proxies)
print(response.json())
This sends your request through the specified proxy and prints back the IP address the target site actually saw, letting you confirm it matches your proxy rather than your real connection.
Rotating Through a List of Proxies Randomly
If you have a list of proxies and want to pick a different one for each request, random.choice() is the simplest approach:
import requests
import random
proxy_list = [
“http://user:[email protected]:8080“,
“http://user:[email protected]:8080“,
“http://user:[email protected]:8080“,
]
def get_random_proxy():
proxy = random.choice(proxy_list)
return {“http”: proxy, “https”: proxy}
for i in range(5):
proxies = get_random_proxy()
response = requests.get(“https://httpbin.org/ip“, proxies=proxies)
print(f”Request {i+1}: {response.json()}”)
Each loop iteration picks a random proxy from your list, so consecutive requests are less likely to come from the same IP.
Rotating Proxies in Sequence with itertools.cycle
If you’d rather cycle through your proxy list in order rather than randomly, Python’s built-in itertools.cycle handles this cleanly:
import requests
import itertools
proxy_list = [
“http://user:[email protected]:8080“,
“http://user:[email protected]:8080“,
“http://user:[email protected]:8080“,
]
proxy_cycle = itertools.cycle(proxy_list)
for i in range(6):
proxy = next(proxy_cycle)
proxies = {“http”: proxy, “https”: proxy}
response = requests.get(“https://httpbin.org/ip“, proxies=proxies)
print(f”Request {i+1} used {proxy}: {response.json()}”)
This guarantees every proxy in your list gets used in even rotation, cycling back to the start once it reaches the end.
Handling Failed Proxies Gracefully
In real scraping work, proxies fail sometimes, they time out, get blocked, or simply go offline. A production-ready rotation setup should handle that instead of crashing your whole script:
import requests
import random
proxy_list = [
“http://user:[email protected]:8080“,
“http://user:[email protected]:8080“,
“http://user:[email protected]:8080“,
]
def fetch_with_retry(url, max_retries=3):
attempted = []
for attempt in range(max_retries):
available = [p for p in proxy_list if p not in attempted]
if not available:
break
proxy = random.choice(available)
attempted.append(proxy)
try:
response = requests.get(
url,
proxies={“http”: proxy, “https”: proxy},
timeout=10
)
return response
except requests.exceptions.RequestException as e:
print(f”Proxy {proxy} failed: {e}. Trying another.”)
continue
raise Exception(“All proxies failed for this request.”)
result = fetch_with_retry(“https://httpbin.org/ip“)
print(result.json())
This version tries a proxy, and if it fails (timeout, connection error, or anything else requests throws), it removes that proxy from consideration for this particular call and tries a different one, up to your set retry limit.
Sticky Sessions for Tasks That Need Consistency
Sometimes you don’t want a new IP on every request, you want the same IP maintained across a whole session, useful for tasks like logging into an account or completing a multi-step checkout flow where switching IPs mid-process would look suspicious.
Many residential proxy providers support this through a session parameter appended to your proxy username. Check your specific provider’s documentation for the exact format, but it typically looks something like this:
import requests
# Many providers let you lock a session by appending a session ID to the username
proxy = “http://username-session-abc123:[email protected]:8080“
proxies = {“http”: proxy, “https”: proxy}
# All requests using this same session ID will route through the same IP
response = requests.get(“https://httpbin.org/ip“, proxies=proxies)
print(response.json())
As long as you reuse the same session ID in your username string, most providers will route you through the same IP for a set time window, commonly 10 minutes, before rotating automatically.
Common Troubleshooting Issues
A few problems come up repeatedly when people set up proxies for the first time:
Authentication errors: Double-check your username and password are correct and that there are no extra spaces. Some providers require the format username:password@ embedded directly in the proxy URL rather than a separate authentication step.
Timeouts: This usually means the proxy is overloaded, offline, or your provider’s IP pool has an issue. Test the same proxy directly with a tool like curl to isolate whether it’s your code or the proxy itself.
Wrong IP still showing after setup: Confirm you saved settings correctly, and check whether your browser has its own separate proxy settings overriding the system-level ones you configured, Firefox being the most common culprit here.
SOCKS5 not supported system-wide: As covered above, Windows’ native proxy settings don’t support SOCKS5 for all applications. You’ll need third-party software like Proxifier for that.
FAQs: How to Set Up a Proxy
It depends on the browser. Chrome and Edge use your operating system's proxy settings automatically, so configuring Windows or macOS covers both. Firefox is the exception, it maintains its own independent proxy settings and won't use your system configuration unless you specifically select "Use system proxy settings" inside Firefox itself.
HTTP and HTTPS proxies are simpler to configure and widely supported across browsers and operating systems, but they're limited to web traffic. SOCKS5 proxies handle a broader range of traffic types and generally offer better performance for tasks beyond browsing, but they're not natively supported everywhere, Windows' built-in system proxy settings being one notable gap that requires third-party tools to fill.
The most common cause is a typo in the proxy dictionary keys. Make sure you're using exactly "http" and "https" as keys, matching the protocol of the URL you're requesting. Also confirm your proxy credentials are correctly embedded in the URL string, since a malformed proxy string often fails silently and requests falls back to a direct connection instead of raising an error.
It depends entirely on your task's scale and how aggressively the target site detects and blocks IPs. For light scraping, a handful of proxies with random rotation is often enough. For high-volume scraping against sites with strong anti-bot protection, you'll want either a large rotating pool from your provider or a dedicated rotating residential proxy plan that handles IP cycling automatically on the provider's end rather than managing a static list yourself.
Yes, run the basic single-proxy test snippet in a loop and print the returned IP address each time. If your rotation logic is working, you should see different IP addresses across consecutive requests. If the same IP keeps showing up despite your rotation code, check whether your proxy provider is actually assigning new IPs per request or whether you're accidentally reusing the same proxy string in your list.
Quick Links:
